How to host an Elementor website?

In This Article
- 1. With Elementor Cloud
- 1.1 Sign Up for Elementor Hosting
- 1.2 Set Up Your Website
- 1.3 Connect a Custom Domain (Optional)
- 1.4 Start Building Your Site
- 2. Self hosting
- 2.1 Choose a Web Hosting Provider
- 2.2 Register a Domain Name
- 2.3 Install WordPress
- 2.4 Install Elementor Plugin
- 2.5 Begin Designing
- Which hosting alternative should you choose?
- Elementor Cloud hosting
- Self-hosting
- Conclusion on Elementor hosting
When setting up an Elementor website, you have two hosting options.
You can use 1) Elementor Cloud (which takes care of everything for you) or 2) self-host (which is a bit more technical).
This article will cover everything you need to get your Elementor website up and running, regardless of what alternative you choose.
Before we begin, I want to share a little tip: If you’re a beginner wanting to get the Elementor website up as quickly as possible, Elementor Cloud is the way to go. If you’re more experienced in web development, self-hosting is preferred.
At the end of this article, we will discuss the pros and cons of both ways of hosting an Elementor website.
Let us start with the easiest hosting alternative: hosting with Elementor Cloud.
1. With Elementor Cloud
1.1 Sign Up for Elementor Hosting

First of all, visit the Elementor Hosting page.
Choose a plan that fits your needs.
These plans include WordPress hosting, ensuring optimal performance and security.
You can choose these plans:
- Lite: For up to 10K monthly visits. Includes Core Website Builder.
- Basic: For up to 25K monthly visits. Includes Pro Website Builder (Essential).
- Business: For up to 50K monthly visits. Includes Pro Website Builder (Advanced Solo).
- Grow: For up to 75K monthly visits. Includes Pro Website Builder (Advanced).
Pro tip: If you’re just starting, use the Lite plan. This plan will get you started with Elementor, but it takes time to build an audience and gain traction on search engines.
1.2 Set Up Your Website
After purchasing a plan, log in to your Elementor account.
Follow Elementor’s guide to set up your new website.
1.3 Connect a Custom Domain (Optional)
You can connect a domain if you have one, but you don’t need to if you don’t.
A custom domain is the URL visitors type to access your website in their browsers.
E.g. domain stackcrawler.com is our domain.
Pro tip 1: New Elementor Hosting subscribers get a free custom domain name.

Pro tip 2: Using a custom domain builds trust. I highly recommend using a custom domain to build brand awareness and trust for your visitors.
Some tips when choosing a domain name:
- Avoid dashes, e.g.,
power-tools.com. Instead, usepowertools.com. - Avoid numbers, e.g.,
4example.com. Numbers confuse, as visitors might not know if it is written “4example” or “fourexample” (or even “forexample”). - Avoid long domain names if possible. Short domain names are easier to remember.
- Avoid unusual extensions. If you are targeting a country, use the respective top-level domain (TLD) for that country. E.g. .es for Spain, .de for Deutschland. TLDs such as .com, .net, and .org are good starting points for international websites.
1.4 Start Building Your Site
Now comes the fun part – designing and building your website.
Elementor is a drag-and-drop WordPress website builder, so you can start building your website immediately.
We have a bunch of articles with inspirational websites built with Elementor:
- The best Elementor websites (massive list).
- The best Elementor e-commerce websites.
- Top Hello Elementor website examples.
Pro tip: Use Elementor Academy to get all the necessary answers to start building with Elementor.

Some hand-picked helpful resources from Elementor Academy:
- Create a website with Elementor: This guide will give you everything you need to know when starting a website with Elementor.
- Create a blog with Elementor: Want to start publishing blog posts? Check out this guide for learning what you need to know.
- Create an e-commerce store with Elementor: Selling goods? Take a look at this guide on how to set up an e-commerce store with Elementor.
Now were going to the other alternative, which is self-hosting an Elementor website.
2. Self hosting
2.1 Choose a Web Hosting Provider
The first thing you’ll need to do is select a hosting provider.
Popular choices are Cloudways, Hostinger, and Bluehost.
2.2 Register a Domain Name
If you don’t have a domain, you must purchase one.
Pro tip: Make sure that your domain name reflects your brand.
2.3 Install WordPress
Now, we’re going to install WordPress.
This step varies depending on whether you have 1) shared hosting or 2) use a VPS.
1) Shared hosting
Most hosting providers have a one-click WordPress installation feature.
| Hosting Provider | One-Click WordPress Installation | Additional Features |
|---|---|---|
| Hostinger | Yes | Managed WordPress hosting, free domain, SSL, LiteSpeed caching, built-in CDN |
| GoDaddy | Yes | 99.9% uptime guarantee, free 24/7 support, enhanced web security trial |
| Bluehost | Yes | Free domain for the first year, enhanced security features |
| A2 Hosting | Yes | SEO-ready, free site migration, optimized performance |
| SiteGround | Yes | Auto-updates, staging, backups, smart WAF, in-house crafted plugins |
| ScalaHosting | Yes | Automatic WordPress updates, cloning, staging, automated backups |
2) VPS
If you’re installing WordPress on a VPS like DigitalOcean, you must make some configurations.
Check this in-depth guide from DigitalOcean on setting up WordPress on managed and unmanaged servers.
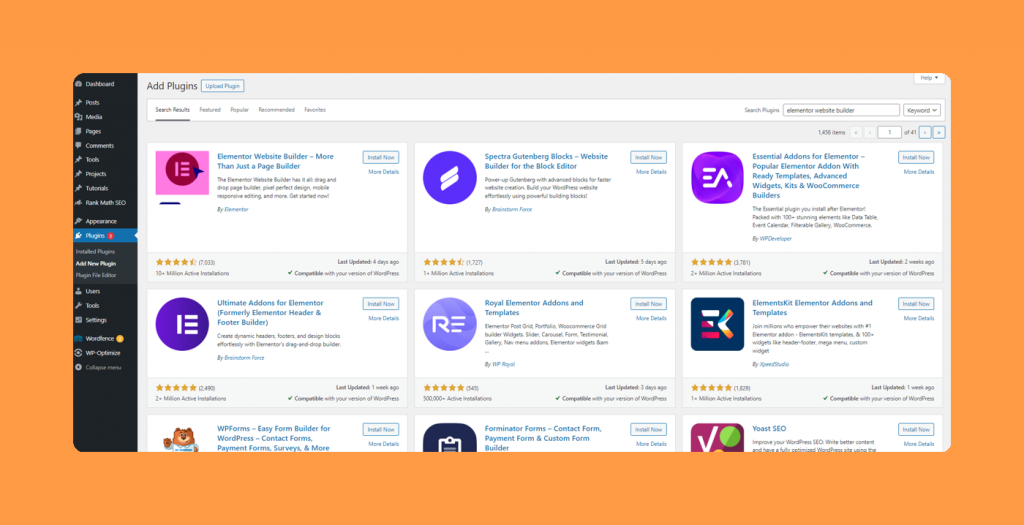
2.4 Install Elementor Plugin
When WordPress is installed and you have logged in, you can install Elementor.
Search for “Elementor Website Builder” in the plugins directory.
2.5 Begin Designing
If you’ve reached this point, you should be able to start designing your website with Elementor.
Which hosting alternative should you choose?
This is a great question. And my least favorite answer to this is: it depends.
Let’s take a look at the pros and cons of the different approaches.
Elementor Cloud hosting
Pros
- Start today: With Elementor Cloud hosting, you can start today — literally today. Select a plan and start right away.
- All in one place: No hassle with external databases, caching, CDNs, and other services.
- Updates taken care of: When using Elementor Cloud, the Elementor team keeps things updated and notifies you when you should take action.
Cons
- Costs more than self-hosting: When using Elementor Cloud, you might pay more than you would with a self-hosted option. While self-hosting can definitely be expensive, a proper self-hosted setup is generally cheaper.
- Vendor lock-in: You lock your website into the Elementor sphere, which means that it’s fine when you’re using Elementor, but if you want to switch to another setup, you have a bit of a job to convert your website.
Self-hosting
Pros
- Cheaper: If you’re a technical person (or know your way around web development), a self-hosted Elementor website is generally cheaper.
- There is no vendor lock-in. You can use whatever hosting options you want and change providers anytime.
Cons
- More technical challenges: Self-hosting any website can be a bumpy road. With a completely self-hosting setup, you are in charge of everything, and no one has your back.
Conclusion on Elementor hosting
If we were to summarize the topic of hosting an Elementor website, we would say this:
- Use Elementor Cloud Hosting if you’re a beginner, are an agency specialized in Elementor websites, or don’t have the technical knowledge to self-host.
- Use self-hosting if you’re an agency with many Elementor websites or have the technical skills to self-host (and all that comes with it).
Christoffer Pettersen
Founder, Web developerPettersen is the founder of Stackcrawler, a platform that helps analyze tech stacks. He is passionate about new trends and technologies in the software industry.